


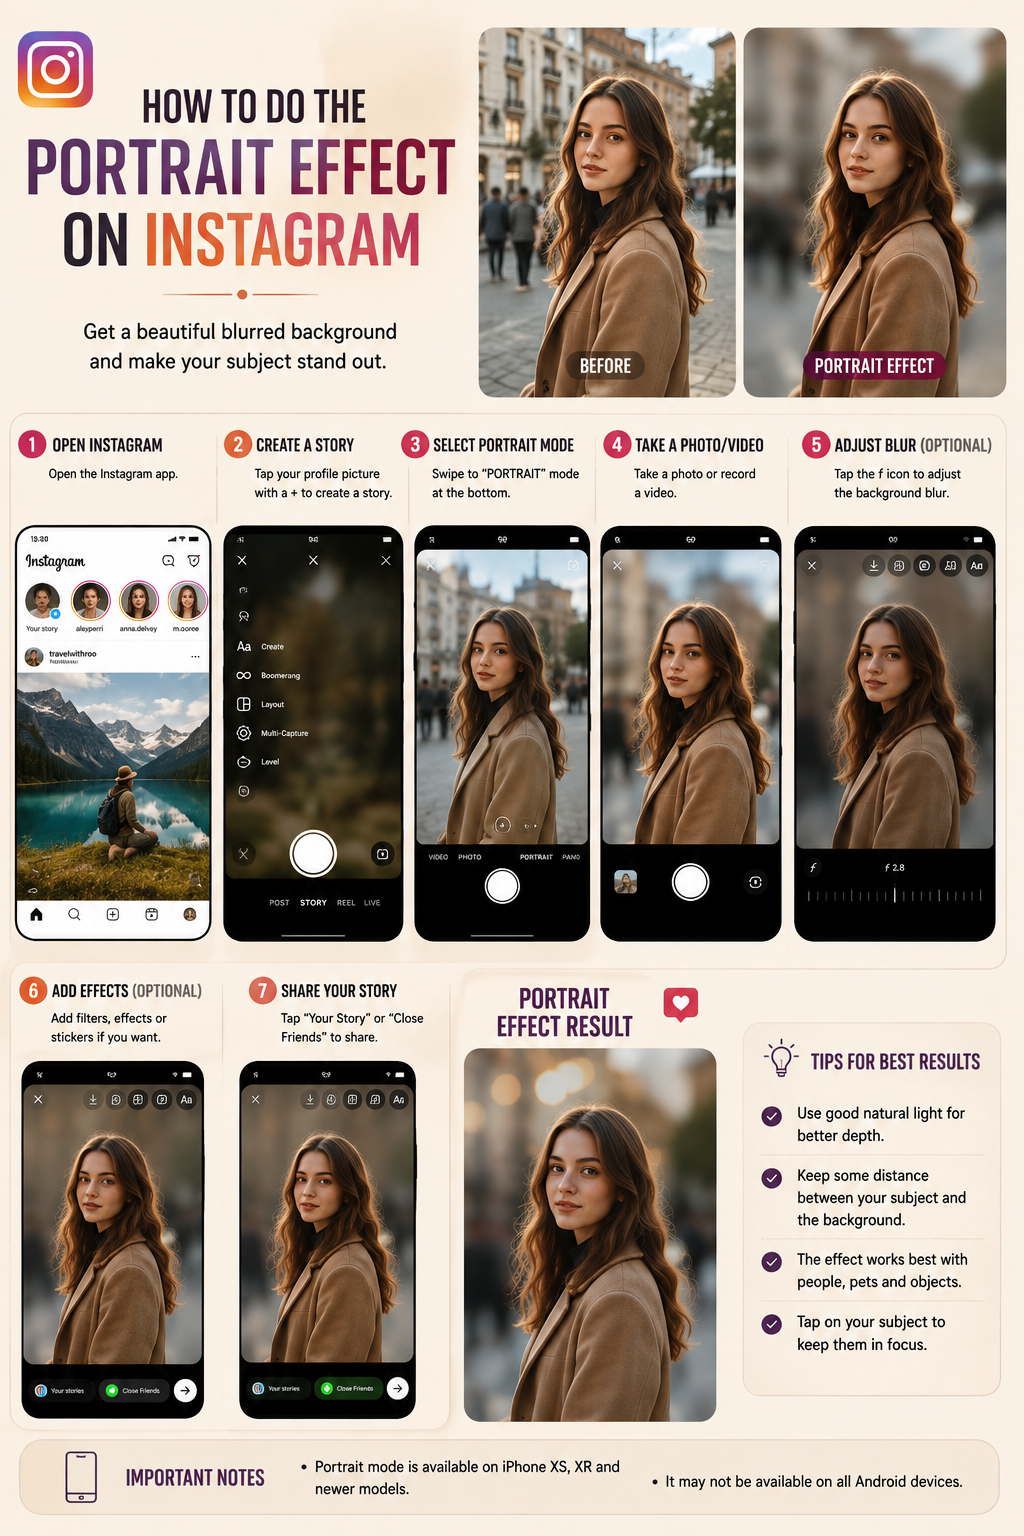

Depending on the Instagram version, device, region, and account you use, the effect may appear under names such as Portrait, Portrait Mode, Focus, Background Blur, Bokeh, Soft Focus, or Cinematic Portrait. In some accounts, you may not see a specific effect with the exact word “Portrait,” but you can still recreate the same appearance through Instagram camera effects, careful lighting, subject placement, your phone’s built in portrait video options, Meta’s Edits application, or an external editor such as CapCut.
According to Instagram’s official camera effects guidance, camera effects can be used in Instagram Stories and Reels, while the platform’s Reels editing instructions explain that creators can browse popular effects or use the search option to find additional ones. Because effects can be added, removed, renamed, or limited to particular accounts, it is more reliable to understand the basic principles of portrait styling instead of depending on one specific filter that may later disappear.
Definitions: What Is the Portrait Effect on Instagram? 👤
The portrait effect is a visual technique that separates the main subject from the surrounding environment. In professional photography and filmmaking, this separation often occurs naturally when the camera uses a wide lens aperture and focuses precisely on the person, causing the background to fall outside the sharp focus area. This visual characteristic is known as a shallow depth of field, and it helps guide the viewer’s eyes toward the most important part of the frame.
Smartphones and social media applications often imitate this appearance digitally. The software analyzes the frame, identifies the face, body, product, or foreground object, and applies blur to the area behind it. More advanced effects attempt to preserve difficult details such as loose hair, fingers, glasses, clothing edges, or pet fur while gradually softening the background. The quality of this separation depends on lighting, movement, subject contrast, camera quality, and the effect’s detection technology.
A portrait effect may also include subtle facial lighting, color correction, skin enhancement, improved contrast, warmer tones, brighter eyes, or gentle edge softening. However, a portrait effect is not automatically the same as a beauty filter. A beauty filter primarily changes skin texture or facial appearance, while a portrait treatment focuses on composition, depth, lighting, subject separation, and visual attention.
Think of the portrait effect as a spotlight in a theatre 🎭. The background does not have to disappear completely, because the scenery still helps tell the story, but the audience must understand which performer deserves attention. A well designed portrait effect performs this task quietly, while an excessive effect can make the subject appear as though they have been cut out and pasted onto a completely separate image.
Why Is the Portrait Effect Important on Instagram?
Instagram is a highly visual platform where users often decide within a few seconds whether they will continue watching a Reel, pause on a Story, or move to the next piece of content. A clear portrait composition creates an immediate focal point, which can make the message easier to understand and reduce the visual effort required from the viewer 👀.
This is particularly important for talking Reels, educational videos, fashion presentations, makeup tutorials, skincare demonstrations, musician performances, personal stories, product reviews, employee introductions, testimonials, and expert commentary. When the creator’s face or the featured object remains clear while unnecessary details become softer, the entire presentation often feels more intentional and professional.
The portrait effect also helps creators work in real environments that are not perfectly designed studios. A home office may contain shelves, chairs, cables, documents, lamps, and household items, while a café or store may include customers, signs, products, lights, and constant movement. Softening these details allows the location to remain visible enough to provide context without overpowering the central subject.
Portrait styling can strengthen emotional connection as well. Viewers naturally pay attention to faces, eye contact, expressions, and gestures, and a calmer background gives these details more room to communicate. When someone shares a personal memory, explains an important subject, or speaks directly to the camera, the softer environment can create a feeling similar to sitting across from that person at a quiet table rather than trying to hear them in a crowded room 💛.
Where Can You Use the Portrait Effect?
| Content Type | Main Subject | Recommended Blur | Important Consideration |
|---|---|---|---|
| Talking Reel | Face and upper body | Low to medium | Keep eye contact and natural skin texture clear |
| Beauty Tutorial | Face, makeup, or skincare product | Low | Do not hide realistic skin details or product texture |
| Fashion Reel | Full body and outfit | Low to medium | Preserve clothing edges and movement |
| Product Presentation | Product held near the creator | Low | Keep labels, materials, and important features readable |
| Music Performance | Performer or instrument | Medium | Use lighting that supports the emotional mood |
| Pet Portrait | Pet’s face and eyes | Low to medium | Check fur edges and rapid movement carefully |
| Business Introduction | Employee or business owner | Low | Keep the environment recognizable and trustworthy |
How to Find the Portrait Effect on Instagram
The fastest way to create the portrait look is to search Instagram’s camera effects library. Open Instagram, tap the creation button, and select either Story or Reel. Open the effects section near the camera controls, then browse available effects or use the search feature.
Search for several related phrases rather than depending on only one term. Useful search expressions include portrait, portrait mode, focus, background blur, bokeh, cinematic, soft background, DSLR, depth effect, and soft focus. Instagram’s interface may display different effect names according to current availability, so searching with multiple phrases usually produces better results.
Step by Step Instagram Method
- Open the Instagram application.
- Tap the creation button or swipe to open the camera.
- Select Reel or Story.
- Tap the Effects icon near the camera controls.
- Open the effects search area.
- Search for portrait, focus, bokeh, blur, or cinematic portrait.
- Preview several effects under the lighting you plan to use.
- Allow the effect a few seconds to recognize your face or body.
- Move your head and hands slowly to test the subject detection.
- Record a short test clip before filming the complete video.
- Review the hair, shoulders, fingers, glasses, clothing, and background edges.
- Record the final content when the effect appears stable.
Do not automatically choose the strongest effect. One portrait filter may simply soften the background, while another may also smooth the skin, enlarge the eyes, change facial proportions, add artificial light, or modify the overall color. The best option depends on whether you want a natural business portrait, a dreamy beauty video, a romantic music Reel, or a stylized fashion presentation.
How to Create a Portrait Effect Without an Instagram Filter
You do not need a dedicated effect to create a convincing portrait appearance. Good positioning and lighting can produce stronger results than an aggressive digital filter, especially when you use a modern phone camera.
Begin by increasing the distance between the subject and the background. Instead of standing directly against a wall, move forward by approximately two to four meters whenever the room allows. This distance creates visible depth and helps both the camera and editing software separate the person from the environment. When the subject and background remain on nearly the same visual plane, the image usually appears flat.
Move the camera closer to the subject while maintaining a natural perspective. For a speaking Reel, a composition from the chest or shoulders upward generally creates a strong personal connection, while a fashion video may require a full body frame. Keep the eyes near the upper section of the image and leave enough room for natural gestures, text, captions, and Instagram interface elements.
Avoid placing the phone extremely close to the face with a wide front camera because this can exaggerate the nose, forehead, or facial proportions. Moving the phone slightly farther away and using a modest crop often creates a more natural portrait. When another person can hold the phone, the rear camera may also provide stronger image quality and better control.
How Lighting Changes the Portrait Effect 💡
Lighting often has a greater influence on portrait quality than the blur itself. A well lit face in front of a simple background may look more professional than a poorly lit face surrounded by an intense digital effect.
For a simple indoor setup, position the subject near a large window and turn the face slightly toward the light. Soft daylight creates gradual shadows and usually produces flattering skin tones. Avoid placing a bright window directly behind the subject unless you are intentionally creating a silhouette, because the camera may darken the face while trying to control the bright background.
When recording at night, use a soft lamp or diffused light near face level. A harsh ceiling light often creates dark shadows around the eyes, nose, and chin, while a light positioned slightly above eye level and to one side can create more natural facial dimension. Ring lights can work well, but reducing their brightness and moving them slightly away from the face often creates a softer result.
The subject should generally be at least as bright as the background. A blurred television, bright lamp, or window can still distract viewers when it remains much brighter than the person. Turn off unnecessary screens, reposition lamps, close curtains, or change the camera angle before recording.
How to Use Your Phone’s Portrait or Cinematic Mode
Some smartphones provide portrait photography, portrait video, aperture simulation, or cinematic recording options inside the regular camera application. You can record the video with one of these modes first and then upload it to Instagram as a Reel or Story.
This method can produce more stable results than a live social media effect because the phone may use depth information, multiple cameras, facial detection, or computational imaging to separate the subject. However, the quality still depends on lighting, subject movement, background distance, and device capabilities.
Record vertically when the final destination is Instagram Reels or Stories, keep the person clearly separated from the background, and review the clip before uploading. If the phone allows you to change the simulated aperture or blur strength after recording, choose a moderate level rather than the maximum option.
How to Create the Portrait Effect with Meta Edits
Meta’s Edits application provides another route for creators who want more control over video projects before publishing them on Instagram. Instagram’s official Edits help section describes the application as a tool for editing video content and sharing it across video platforms, while separate guidance explains that effects can be added to selected clips inside the timeline.
Open Edits, create a project, import your portrait video, and examine the available effects and adjustment controls. Depending on the current version, you may be able to soften the image, change exposure, modify color, improve contrast, apply clip effects, or use tools that simplify the background. Even when a one tap portrait blur is not available, you can still improve the portrait appearance by reducing background brightness, warming the subject, slightly softening harsh detail, and keeping the face brighter than the surrounding environment.
How to Create a Stronger Portrait Effect in CapCut
CapCut provides a reliable layered method when you want to blur the background while keeping the person sharp. The process uses two copies of the same video. The lower copy receives the blur effect, while the upper copy remains clear and uses automatic background removal to isolate the person.
CapCut’s official background blur guide explains this workflow for both desktop and mobile editing. The guide recommends duplicating the video, applying blur to the lower layer, and using automatic background removal on the upper layer so the sharp subject remains visible above the softened environment.
CapCut Mobile Workflow
- Open CapCut and select New Project.
- Import your vertical portrait video.
- Place the video on the main timeline.
- Open Effects and search for a blur effect.
- Apply the blur across the required duration.
- Adjust the intensity until the background becomes softer but remains believable.
- Add the original unblurred video again as an overlay.
- Align the overlay precisely with the lower video.
- Select the overlay and open Remove Background.
- Use automatic removal to isolate the subject.
- Review the complete clip for errors around hair, hands, clothing, and objects.
- Correct color, exposure, sound, text, and captions.
- Export the video and upload it to Instagram.
The strongest blur is rarely the most realistic option. Real camera lenses usually create gradual depth, meaning areas near the subject may remain partly recognizable while distant objects appear softer. When the complete background becomes an unrecognizable cloud, the video may resemble a virtual meeting background rather than a cinematic portrait.
How to Improve Hair, Hands, and Subject Edges
Automatic portrait effects frequently struggle with loose hair, transparent glasses, earrings, fingers, pet fur, moving fabric, plants, and objects held near the body. These details contain complex edges that can be difficult for software to separate from the background.
Improve the result by recording in good light, choosing a background with a different color from the subject, and avoiding excessive movement. Dark hair against a dark wall may disappear into the background, while dark hair against a lighter neutral wall usually produces cleaner separation.
If your editing application includes feathering, edge refinement, mask expansion, or manual correction, apply these tools carefully. An extremely hard edge can make the person look like a sticker, while excessive feathering creates a glowing outline. The transition should remain slightly soft without becoming visibly artificial.
Portrait Effect Workflow Diagram
Choose the Main Subject
          ↓
Create Background Distance
          ↓
Set Soft, Directional Lighting
          ↓
Frame the Face, Body, or Product
          ↓
Search for an Instagram Portrait Effect
          ↓
Test Hair, Hands, and Movement
          ↓
Record Several Short Clips
          ↓
Adjust Color and Blur Strength
          ↓
Add Captions, Music, and Text
          ↓
Review on a Phone Screen
          ↓
Publish as a Reel or Story
A Practical Instagram Portrait Example
Imagine that a small skincare brand wants to record a Reel explaining how to use a facial serum. In the first version, the presenter stands directly against a shelf containing many colorful products, records under a ceiling light, and applies a strong beauty effect. The presenter’s skin appears overly smooth, the shelf remains visually crowded, shadows form beneath the eyes, and the featured serum becomes difficult to distinguish from the background.
For the improved version, the presenter moves approximately three meters away from the shelf, stands near a window, and positions the phone slightly farther from the face. A subtle portrait effect softens the shelf, while the presenter holds the serum near the same distance as the face. The product remains readable, the skin retains natural texture, and the background still communicates that the video was recorded in a professional skincare environment 🧴✨.
The second version feels more trustworthy because the effect supports the explanation instead of changing the presenter beyond recognition. The viewer can focus on the person and product while still understanding the location and context.
A Practical Editing Anecdote
When I evaluate a portrait video, I usually review the unedited clip before looking at the effects because this quickly reveals whether the problem comes from the recording or the software. Creators often try to solve poor lighting, weak composition, distracting backgrounds, and unflattering camera angles by increasing blur and beauty settings, but stronger effects usually make these problems more obvious.
In many cases, the most effective improvement comes from turning off the effect, moving the subject away from the wall, rotating the person toward a window, lowering the phone slightly, and recording again. After these changes, only a small amount of digital blur is needed. This experience supports an important principle: portrait effects should complete good visual decisions rather than replace them.
How to Create an Emotional Portrait Reel 💛
A portrait effect becomes especially valuable when the subject is communicating something personal, thoughtful, educational, or emotional. A softly blurred background reduces visual noise and allows viewers to notice small expressions, eye movement, hesitation, smiles, and hand gestures.
Look toward the camera lens rather than watching your own face on the screen, speak naturally, and allow short pauses between important ideas. Place captions where they remain easy to read without covering the eyes or mouth. Keep the background soft but recognizable so the viewer feels present in the environment rather than disconnected from it.
The effect should feel like a quiet room around the speaker. It cannot create sincerity by itself, but it can remove distractions that prevent sincerity from being noticed.
Common Portrait Effect Mistakes
Using Excessive Blur
Strong blur can remove all environmental context and make the subject appear digitally pasted onto the screen. Reduce the intensity until the background remains soft but believable.
Applying Too Much Skin Smoothing
Excessive smoothing can remove natural texture, facial character, and credibility. This is particularly risky for skincare, makeup, health, educational, and professional content.
Standing Against the Wall
A subject positioned directly against the background creates a flat image and gives the effect less depth information. Move forward whenever space allows.
Ignoring Bright Background Objects
A blurred television, window, or lamp can remain distracting when it is much brighter than the subject. Control background brightness before recording.
Using Similar Subject and Background Colors
Automatic effects may remove hair, clothing, or body edges when their colors match the background. Create visual contrast through clothing, lighting, or location choices.
Moving Too Quickly
Fast gestures and sudden head movements may cause the effect to lose track of the subject. Move naturally but avoid unnecessary rapid motion.
Blurring the Product
When presenting an object, keep it close to the same focus distance as the face. Extending it too far toward the camera may cause either the person or product to become soft.
Placing Text Over the Face
Use the blurred background as a natural text area and protect the face, eyes, mouth, and featured product from unnecessary overlays.
People Also Asked
Does Instagram have a built in portrait effect?
Instagram provides searchable camera effects for Stories and Reels, and some accounts may display portrait, focus, bokeh, blur, or similarly named options. Availability can vary according to device, region, account, and application version.
Why can I not find the portrait effect on Instagram?
The effect may have been renamed, removed, limited to particular accounts, or replaced by another version. Update Instagram and search for focus, bokeh, cinematic portrait, soft background, or blur instead.
Can I blur the background of an Instagram Reel after recording?
You may be able to apply a suitable effect during the Instagram editing process, depending on the current tools available to your account. For more control, edit the background in Edits, CapCut, or your phone’s camera application before uploading.
Is the portrait effect the same as Focus mode?
They are closely related because both attempt to emphasize the subject and soften the background, but individual effects may also change lighting, color, skin appearance, or facial features.
Can I use the portrait effect on products or pets?
Yes, although automatic detection may be less stable around transparent products, reflective surfaces, pet fur, fast movement, or unusually shaped objects. Good lighting and a contrasting background improve the result.
Frequently Asked Questions
1. Which search terms should I use in Instagram Effects?
Search for portrait, portrait mode, focus, background blur, bokeh, cinematic, soft focus, DSLR, depth effect, and soft background. Testing several expressions usually produces more options.
2. How far should I stand from the background?
Approximately two to four meters is a useful starting point when the space allows. Greater distance generally creates stronger natural depth and helps digital detection.
3. Should I use the front or rear camera?
The front camera is convenient when recording alone, while the rear camera often provides stronger image quality and better detail. Use a tripod, remote control, timer, or another person when recording with the rear camera.
4. What is the best lighting for an Instagram portrait?
Soft window light is one of the easiest options. Position the face toward the window or at a slight angle and avoid placing an extremely bright window directly behind the subject.
5. Why does the effect remove parts of my hair?
Loose hair contains thin and complex edges that are difficult for automatic detection. Improve lighting, choose a contrasting background, reduce rapid movement, and lower the blur strength.
6. Can I use the portrait effect for full body fashion Reels?
Yes, but test the effect around shoes, flowing clothing, hair, and moving arms. A low to medium blur usually preserves the outfit better than an aggressive effect.
7. How can I keep both my face and product sharp?
Hold the product near the same distance from the camera as your face. When the object moves much closer to the lens, the focus system may prioritize one subject and soften the other.
8. Why does my portrait effect look like a video call background?
The blur may be too strong, the subject edge may be too hard, or the environment may lack gradual depth. Lower the blur strength and preserve some background detail.
9. Should captions be placed over the blurred background?
Yes, a softly blurred area often provides an excellent location for readable captions. Keep the text away from the face, important gestures, products, and Instagram interface elements.
10. Is the portrait effect suitable for professional business accounts?
Yes. A subtle portrait treatment can improve expert videos, employee introductions, testimonials, service explanations, educational Reels, and product presentations while maintaining a natural and trustworthy appearance.
Conclusion
Creating the portrait effect on Instagram is not simply a matter of selecting the strongest blur filter available. The most convincing result comes from combining background distance, flattering lighting, careful framing, natural movement, accurate subject detection, restrained color correction, and moderate blur 📸✨.
Instagram’s searchable camera effects offer the fastest method for Stories and Reels, while your phone’s portrait or cinematic recording features may provide more stable depth. Meta Edits can help refine the overall visual style, and CapCut offers a useful layered workflow when you need to keep the subject sharp while controlling the background blur more precisely.
Always improve the original scene before depending on software. Move the subject away from the wall, control bright background objects, turn the face toward soft light, and record a short test clip. Review hair, hands, clothing, products, glasses, and moving edges before publishing.
A successful portrait effect does not attract attention to the editing itself. It quietly guides the viewer toward the person, expression, product, or message that matters most, and when viewers notice the subject before they notice the blur, the effect has achieved its real purpose 💫.